Original NNAT-style sample questions

TRY. COMPARE. UNDERSTAND.

Original NNAT-style sample questions

Explore four original worked examples: two missing-pattern problems and two visual analogies. Choose an answer before revealing the reasoning. These are independent teaching examples, not a full NNAT3 test or a score predictor.

Updated October 8, 2026 · Independent parent guide

How to use these samples

Begin untimed. Study the whole picture, describe a clue and compare all five choices. Open the explanation only after an attempt, then discuss one wrong choice that seemed plausible. There is no need to sign in or provide an email to read these examples.

The examples come from our owner-reviewed local bank. Their level and difficulty labels are editorial estimates; four examples do not represent every NNAT3 level, every category or an official form.

Example 1: continue the curved bands

Original worked example · five choices

Choose the piece that completes the picture. Attempt it before opening the explanation.
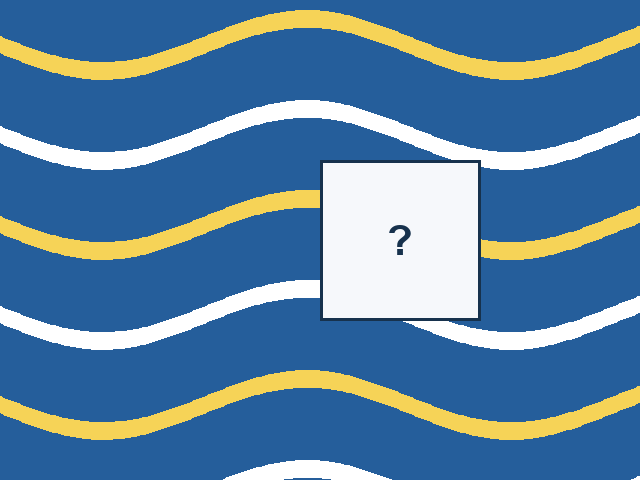
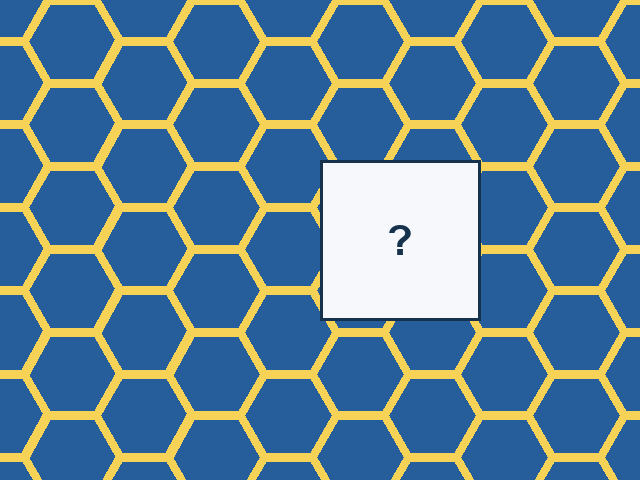
A wave bands design with a rectangular missing tile on its right side.
Square pattern piece. Edge positions run from 0 to 159. top edge: blue 0–159; bottom edge: blue 0–105, white 106–149, blue 150–159; left edge: blue 0–30, yellow 31–47, blue 48–120, white 121–137, blue 138–159; right edge: blue 0–72, yellow 73–89, blue 90–159.
Choice A
Square pattern piece. Edge positions run from 0 to 159. top edge: blue 0–43, white 44–92, blue 93–159; bottom edge: white 0–32, blue 33–159; left edge: blue 0–63, yellow 64–80, blue 81–153, white 154–159; right edge: blue 0–21, white 22–39, blue 40–111, yellow 112–129, blue 130–159.
Choice B
Square pattern piece. Edge positions run from 0 to 159. top edge: blue 0–52, white 53–98, blue 99–159; bottom edge: white 0–41, blue 42–159; left edge: blue 0–54, yellow 55–72, blue 73–144, white 145–159; right edge: blue 0–10, white 11–28, blue 29–100, yellow 101–118, blue 119–159.
Choice C
Square pattern piece. Edge positions run from 0 to 159. top edge: blue 0–159; bottom edge: blue 0–159; left edge: blue 0–11, yellow 12–28, blue 29–101, white 102–118, blue 119–159; right edge: blue 0–42, yellow 43–59, blue 60–132, white 133–149, blue 150–159.
Choice D
Square pattern piece. Edge positions run from 0 to 159. top edge: blue 0–133, white 134–159; bottom edge: blue 0–78, white 79–122, blue 123–159; left edge: blue 0–30, yellow 31–47, blue 48–120, white 121–137, blue 138–159; right edge: white 0–6, blue 7–78, yellow 79–96, blue 97–159.
Choice E
Reveal the answer and reasoning

Answer: E. Follow each curved band across the empty space. Its height and direction must match on both sides. Compare every side of each candidate before choosing. The correct piece preserves the whole design.

  • A: The boundary pattern is displaced horizontally; check where the colored regions meet the gap.
  • B: The boundary pattern is displaced vertically; check where the colored regions meet the gap.
  • C: The boundary pattern is displaced in both directions; check where the colored regions meet the gap.
  • D: The boundary pattern is displaced in both directions; check where the colored regions meet the gap.
  • E: All line ends and color regions continue into the surrounding design.

Independent teaching example. Its level and difficulty are editorial estimates; it is not an official NNAT item or score predictor.

Example 2: continue the hexagon outlines

Original worked example · five choices

Choose the piece that completes the picture. Attempt it before opening the explanation.

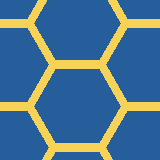
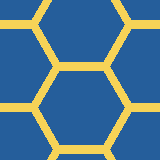
A hexagon tiling design with a rectangular missing part.
Square pattern piece. Edge positions run from 0 to 159. top edge: blue 0–7, yellow 8–17, blue 18–62, yellow 63–72, blue 73–151, yellow 152–159; bottom edge: blue 0–3, yellow 4–13, blue 14–66, yellow 67–76, blue 77–147, yellow 148–157, blue 158–159; left edge: blue 0–25, yellow 26–41, blue 42–52, yellow 53–69, blue 70–108, yellow 109–124, blue 125–135, yellow 136–152, blue 153–159; right edge: yellow 0–15, blue 16–79, yellow 80–98, blue 99–159.
Choice A
Square pattern piece. Edge positions run from 0 to 159. top edge: blue 0–30, yellow 31–40, blue 41–85, yellow 86–95, blue 96–159; bottom edge: blue 0–26, yellow 27–36, blue 37–89, yellow 90–99, blue 100–159; left edge: blue 0–42, yellow 43–51, blue 52–125, yellow 126–134, blue 135–159; right edge: blue 0–39, yellow 40–55, blue 56–122, yellow 123–138, blue 139–159.
Choice B
Square pattern piece. Edge positions run from 0 to 159. top edge: yellow 0–0, blue 1–79, yellow 80–88, blue 89–135, yellow 136–144, blue 145–159; bottom edge: blue 0–83, yellow 84–140, blue 141–159; left edge: yellow 0–15, blue 16–54, yellow 55–70, blue 71–81, yellow 82–98, blue 99–137, yellow 138–153, blue 154–159; right edge: blue 0–25, yellow 26–44, blue 45–108, yellow 109–127, blue 128–159.
Choice C
Square pattern piece. Edge positions run from 0 to 159. top edge: blue 0–37, yellow 38–46, blue 47–107, yellow 108–116, blue 117–159; bottom edge: blue 0–41, yellow 42–50, blue 51–103, yellow 104–112, blue 113–159; left edge: blue 0–18, yellow 19–27, blue 28–101, yellow 102–110, blue 111–159; right edge: blue 0–18, yellow 19–27, blue 28–101, yellow 102–110, blue 111–159.
Choice D
Square pattern piece. Edge positions run from 0 to 159. top edge: blue 0–42, yellow 43–51, blue 52–110, yellow 111–119, blue 120–159; bottom edge: blue 0–46, yellow 47–55, blue 56–106, yellow 107–115, blue 116–159; left edge: blue 0–19, yellow 20–28, blue 29–102, yellow 103–111, blue 112–159; right edge: blue 0–19, yellow 20–28, blue 29–102, yellow 103–111, blue 112–159.
Choice E
Reveal the answer and reasoning

Answer: A. Continue the six-sided outlines. The sides must meet the neighboring hexagons without shifting the tiling. Compare all four sides; matching one edge alone is insufficient.

  • A: Every visible boundary continues into the surrounding pattern.
  • B: This shifts the pattern horizontally; compare every edge with the surrounding design.
  • C: This shifts the pattern vertically; compare every edge with the surrounding design.
  • D: This shifts the pattern in both directions; compare every edge with the surrounding design.
  • E: This shifts the pattern in both directions; compare every edge with the surrounding design.

Independent teaching example. Its level and difficulty are editorial estimates; it is not an official NNAT item or score predictor.

Example 3: exchange the layer colors

Original worked example · five choices

Choose the piece that completes the picture. Attempt it before opening the explanation.

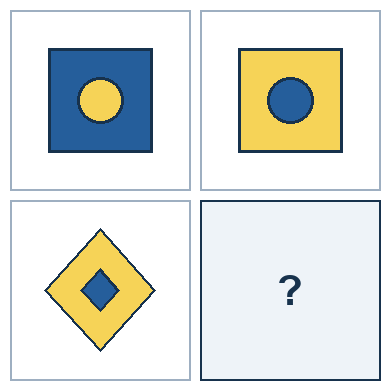
2 rows of paired geometric pictures. The last right-hand picture is missing.
blue diamond centered at (90, 90), blue inner diamond radius 23. Coordinates refer to a 180 by 180 tile.
Choice A
blue diamond centered at (112, 90), yellow inner diamond radius 23. Coordinates refer to a 180 by 180 tile.
Choice B
blue diamond centered at (90, 90), yellow inner diamond radius 23. Coordinates refer to a 180 by 180 tile.
Choice C
yellow diamond centered at (90, 90), blue inner diamond radius 23. Coordinates refer to a 180 by 180 tile.
Choice D
yellow diamond centered at (90, 90), yellow inner diamond radius 23. Coordinates refer to a 180 by 180 tile.
Choice E
Reveal the answer and reasoning

Answer: C. The outer shape takes the inner shape’s color, and the inner shape takes the outer shape’s color. Their shapes, positions and sizes do not change. Apply the same relationship to the last left-hand picture and check every choice.

  • A: Only one layer changes color; the demonstrated rule exchanges both layer colors.
  • B: The horizontal position changes in a way the completed row does not show.
  • C: The same relationship is applied to every relevant part, while the other features stay unchanged.
  • D: This repeats the starting picture and misses the demonstrated change.
  • E: Only one layer changes color; the demonstrated rule exchanges both layer colors.

Independent teaching example. Its level and difficulty are editorial estimates; it is not an official NNAT item or score predictor.

Example 4: compare changes in size

Original worked example · five choices

Choose the piece that completes the picture. Attempt it before opening the explanation.

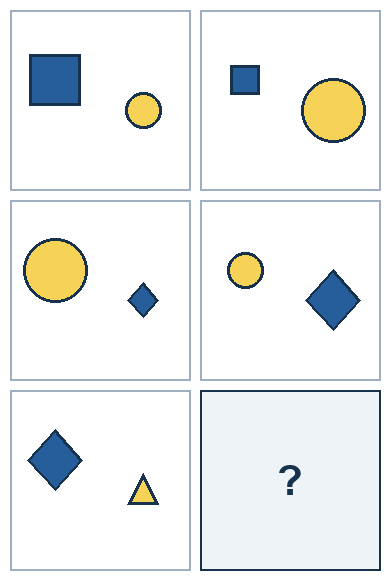
Three rows of paired geometric pictures; the last right-hand picture is missing.
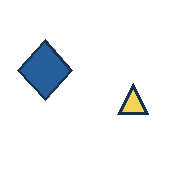
blue diamond centered at (45, 70); yellow triangle centered at (133, 100). Coordinates refer to a 180 by 180 tile. Outer shape radii in object order: 32, 18 pixels.
Choice A
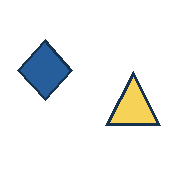
blue diamond centered at (45, 70); yellow triangle centered at (133, 100). Coordinates refer to a 180 by 180 tile. Outer shape radii in object order: 32, 32 pixels.
Choice B
yellow diamond centered at (45, 70); yellow triangle centered at (133, 100). Coordinates refer to a 180 by 180 tile. Outer shape radii in object order: 18, 32 pixels.
Choice C
blue diamond centered at (61, 70); yellow triangle centered at (133, 100). Coordinates refer to a 180 by 180 tile. Outer shape radii in object order: 18, 32 pixels.
Choice D
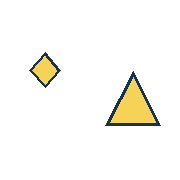
blue diamond centered at (45, 70); yellow triangle centered at (133, 100). Coordinates refer to a 180 by 180 tile. Outer shape radii in object order: 18, 32 pixels.
Choice E
Reveal the answer and reasoning

Answer: E. The large object becomes small and the small object becomes large. Each keeps its own center, shape and color. Apply the same change to the last row and compare all five choices.

  • A: This leaves the starting picture unchanged instead of applying the demonstrated relationship.
  • B: Only one object follows the change; both must follow the completed examples.
  • C: This also changes the color of one object in a way the examples do not show.
  • D: This also changes the horizontal position of one object in a way the examples do not show.
  • E: All relevant objects follow the demonstrated relationship; other features are preserved.

Independent teaching example. Its level and difficulty are editorial estimates; it is not an official NNAT item or score predictor.

What did the explanation reveal?

Notice whether the missed clue involved an edge, an unchanged feature, a second object or an unsupported change. That observation can guide the next learning activity. Do not convert performance on these examples into an NAI, percentile rank or gifted-program prediction.

Read the missing-pattern lesson or the analogy lesson for a repeatable solving routine.

Continue exploring

NNAT3.org is an independent educational resource and is not affiliated with or endorsed by Pearson. Practice materials are original and are not official NNAT test items.

Scroll to Top